Jill Taylor

Jill Taylor
Jill Taylor

Wednesday, December 27, 2017

Believe in the Magic of Christmas

Hello my fellow crafters!  I've created this card for the Kennedy Grace Creations December Blog.  As December winds to a close, I hope you all had a very Merry Christmas with family and/or friends.  Although Christmas is now past, I made this card last month before I realized my post would be after Christmas!
To me however, Christmas is not just one day, but the beginning of forever (if you believe).  And as many crafters do, they make Christmas cards all year 'round.  So this is especially for those of you who never get tired of seeing or making Christmas cards.
You may recognize the wreath element in my card and the background technique I used on this card.  I used an Antique Linen  Distress Oxide pad and dragged it down the length of the cardstock several times to create a wooden door or panel look.  Then, I wanted to show how you can totally change the look of your card/wreath simply by changing up your ink colors (see my November Mood Board card for comparison, above).
To make the wreath element, I used the exact same technique as the prior card:  I traced a circle lightly the size I wanted the wreath, then used the 2 small leafy branches from the Kennedy Grace Creations stamp You Inspire Me.  I used 3 green colors from Hero Arts, (Green Hills, Field Greens and Moss).  I stamped 1 color at a time, spacing the branches out and changing the angle of the branches with each new color as I stamped around the circle.  This allowed me to get a fairly even dispersion of the colors, without any distracting clumping up of the colors.  I then used a Hero Arts Red (mini cube from My Monthly Hero Kit, unlabeled) for the berries, that I stamped using the 3 small dots on the You Inspire Me stamp set.  I used the berries to fill in any gaps that may have been present.

Next, I die cut the center of the wreath out.  At first I was going to make a shaker card, but not finding the exact color shaker elements I was looking for, I expanded my search to other things.  I looked into my stash of older Christmas stamps and I found this very cute wood block stamp from Stampendous! called Manger Kisses.  It fit perfectly in the window!  I quickly Copic colored the image, added a little clear Wink of Stella and set it aside.  Next I placed a mask over my wreath and stamped the sentiment from Sunny Studio's Holiday Style three times for an ombre-type look, once above and twice below in Ranger Distress Oxide Inks/DOIs (Worn Lipstick, Candied apple, and Fired Brick), then used some clear embossing powder over them.  I stamped the ink layered bow from the same Sunny Studio stamp set in Frayed Burlap DOIDelicata Gold and Walnut Stain DOI and clear embossed that as well, then foam mounted it to the wreath.  I repeated the stamping of the small leafy branches and a berry next to the sentiments on the bottom.  

To finish assembling my card, I adhered some clear acetate to the back side of the wreath panel, then cut some Fun Foam slightly smaller than my panel.  I traced the circle from inside my wreath onto the Fun Foam then die cut out a circle slightly larger.  I cut down my card panel to 4 inches in width, then adhered the Fun Foam to the back side of my card panel.  Next I used some #110 NSW cardstock for a top folding A2 cardbase.  I placed some narrow strips of red glitter paper from Stampin' Up! along the edges, then adhered the little manger scene onto it so it was centered in the wreath window.  Before I adhered my card panel to the base, I sponged on some Brushed Burlap Distress Oxide ink along the inside of the wreath, giving it a "wooden edge" or distressed feel.  Then I adhered my card panel onto the prepared cardbase.


As I often do, I add one final detail that in my mind finally completes my card.  You can't really see them in the picture, but in real life you see them quite easily and they just add a wonderful element.  They are small gold adhesive dots (in varying sizes) from Starform.  The dots were small details from a larger adhesive image, but they were perfect for my project!  I scattered them about the wreath and declared my card done.

I hope you enjoyed my card and the versatility of the You Inspire Me stamp set.  Wishing everyone a happy and healthy 2018!

Jill


To see more of my card creations, please visit me on Instagram as jktaylor911 for the largest collection of my cards and Facebook as Jill Taylor.

For your convenience I linked the Kennedy Grace Creations products to the store.


Please be sure to follow the Kennedy Grace Creations blogfacebooktwitterinstagram and pinterest. Our Design Team has great projects to inspire you with our great stamp sets.

Wednesday, December 13, 2017

Joy Peace Love, December Mood Board for Kennedy Grace Creations

December is here and Christmas is getting near!  Hi there, I've created this card for the Kennedy Grace Creations Mood Board this month (see below).  I continued my playtime with Yupo paper and Ranger Alcohol Inks to create the background for my card.  I think this one turned out fabulous!  I used just 2 colors of alcohol ink, Stream and the Pearl Mixative, along with the Blending Solution.  Since I knew this was going to be the background, and I didn't want to cover too much of it up, I decided to add some die cutting in the center of the card, make it a shaker element (I do love Shakers, you've probably noticed!) and then add some simple, elegant floral images from Kennedy Grace Creations (white heat-embossed) to the two opposing corners.                                                   
 
Here's what I did.  After the Yupo paper dried completely, I die cut the Stitched Square from Simon Says Stamp from the middle of the 5" x 5" Yupo panel.  I then die cut the three Holiday Words die from Essentials by Ellen from both the Stitched Square Yupo panel and some white Woodgrain cardstock from Essentials by Ellen.  I thought the texture would add a lovely element to the card.  Next I adhered a piece of clear acetate to the back of the die cut Yupo paper, then ran the three words through my Xyron 5" Creative Station.  I then carefully inlaid the words onto the Yupo paper.

Now came the difficult part.  I wanted to have more than one shaker well, so that all the sequins wouldn't fall down to the lower "O".  So what I did was use my Stampin' Up! Foam Adhesive Strips to divide up the windows.  I ended up with 3 wells (see picture below).  I carefully added specific sequins from 3 Kennedy Grace Creations Sequin Mixes (Dress BluesHoneyBee, and Beachside Bliss).  I then removed the adhesive backing and adhered a piece of Crafter's Companion Shimmering Cardstock in Silver Starlight to the back of the shaker element.  I trimmed off any excess around the edges.

Next I went back to the Yupo frame section and prepped the frame with an anti-static tool.  I used the large flower image from Kennedy Grace Creations Loving Mom stamp set.  I stamped it in Versamark ink first, then used some WOW! Opaque White Fine Embossing Powder.  I heat embossed it carefully as the Yupo paper can warp with a heat tool used too aggressively.  Think of it like embossing on Vellum, use the same technique and you shouldn't have any problems.

I decided to frame my card with both Whisper White and Tempting Turquoise cardstock from Stampin' Up!  Lastly, I adhered my shaker element to the center of the card.

I had so much fun making this card!  I hope you try out some of the products and/or techniques used here.  I've linked up the Kennedy Grace Creations products to the store for your convenience.

To see the most comprehensive collection of additional card creations by me, find me on Instagram as jktaylor911 or on Facebook as Jill Taylor.

Thank you, and I wish you all a very blessed Christmas season.

Jill

Please be sure to follow the Kennedy Grace Creations blogfacebooktwitterinstagram and pinterest. Our Design Team has great projects to inspire you with our great stamp sets. 

Wednesday, November 29, 2017

Kennedy Grace Creations Card, God's Greatest Gift

Hello holiday crafters, I'm in full Christmas swing here on my Blog!!  My card today is called "God's Greatest Gift."  I wanted to shake things up a bit by using a technique I had never used before - Yupo paper and Ranger alcohol inks.  I created my card background using several colors (in hindsight I would have used fewer) and the silver metallic mixative (love it!).  I then embossed the Yupo paper with a Sizzix Christmas snowflakes embossing folder that I discovered in my stash (I don't tend to use a lot of embossing folders, so I sometimes forget about them).  But that was exactly what this Yupo paper needed to make it look like a Christmas background!


I then die cut Penny Black's Manger die from the middle of the central embossed snowflake on the card panel, then die cut it again from NSW #110 cardstock.  I inlaid the white die cut into the Yupo paper, then adhered some clear acetate to the back side of it.  I used some Fun Foam on the back side of the Yupo paper so that my shaker window would have some depth.  I then used my 1/4" Scor-Tape all the way around the circle opening on the Fun Foam.  With the card facing down, I filled the shaker window with several types of Kennedy Grace Creations fabulous Sequin Mixes (Dress BluesBeachside Bliss and Caramel Apple).  I then very carefully adhered my Brushed Silver top folding card base from Stampin' Up!
I felt the card needed more white cardstock to balance out the white of the Manger die cut, so I added a white frame, using Avery Elle's Scalloped Pierced Rectangle die.  Then to finish it off, I heat embossed the sentiment from Kennedy Grace Creations Sweet Baby Mine stamp set with Brutus Monroe's Sterling Ultra Fine Embossing Powder.  I cut the sentiment strip from a MFTs Blueprints 29 Die-namics that I cut down as it was a bit too long, then adhered it with dimensionals.  Thinking I was done, I took some photos of my card and looked at them as I was writing this post, and decided one thing was missing.  It's on the last picture here.  It's the rhinestone on the Star of David above the manger scene.  It just looked incomplete without it, so I added it at the very last moment.  Sometimes you can't tell what's missing until you see your card on your blog post and it's one of those Ah-Ha moments!


I hope you enjoyed my card.  For tips on how to create different types of backgrounds using Yupo paper and alcohol inks, see Jennifer McGuire's videos (she has 2 that I know of).  To see more of my card creations, or others on the Design Team for Kennedy Grace Creations, go to http://kennedygracecreations.blogspot.com/  or jktaylor911 on Instagram for all my creations.


Wishing all of you Christmas Blessings and a fabulous Holiday season!

Jill 

** I've linked all the KGC products to the store for your convenience, as well as the Jennifer McGuire video I refer to. **


Please be sure to follow the Kennedy Grace Creations blogfacebooktwitterinstagram and pinterest. Our Design Team has great projects to inspire you with our great stamp sets. 

Monday, November 20, 2017

Oh Holy Night Christmas Card

Welcome back to my blog, this one is for me for a change.  I love playing with my new Christmas Stamps and dies!  I hope I'm not the only one who buys more than I can ever hope to use in one season.  Does that make me a hoarder??  Well, perhaps but I'm OK with that!

For this card I used a beautiful background stamp from The Ton called, Poinsettia Close Up.  I stamped it in Versamark on Arches Hot Pressed watercolor paper and heat embossed it with Brutus Monroe's Sterling Ultra Fine Embossing Powder.  I then water-colored it with Daniel Smith Watercolors.  I used a combination of Mayan Blue Genuine, Moon Glow and French Ultramarine on the flower portion, and along the edges (in a few places) I used Iridescent Sunstone to give it a golden hue.  I then took my Simon Says Stamp die, O Holy Night (2 pieces)  and die cut out the outline portion of the die from the middle of the Poinsettia.  I adhered some clear acetate to the back side, then adhered the silver glitter paper die cut, O Holy Night, to the front side.  I had used my 5 inch Xyron to apply adhesive to the back of the die cut.

I next adhered some cut up pieces of Fun Foam to the back side of my card around the window portion to keep the sequins confined.  I chose a hand-picked mixture of Kennedy Grace Creations sequins (Dress Blues, Tropical Treasure, and Beach Side Bliss) to create the perfect color scheme for my card.  For the back of the shaker window, I decided a dark background looked best, so I chose The Ton's gorgeous Glossy Fine Black Adhesive Paper.  It's a subtle sparkle in the background that I just love!  Now that my sequins were secure in their window, I adhered the panel to a 5" x 5" white #110 NSW top folding card base.  Feeling like the card needed a frame, I used the largest Scalloped Square Die from Stampin' Up! and used the outside portion to frame my card.  Lastly, I used the same sequin elements I chose for the inside of my card as the sequin details for the outside of my card as well.

I hope you enjoyed my card creation, I had fun making it!  Hope you visit again for some more Christmas inspiration.  If you like this card and would like to see more of what I make, I post almost everything on Instagram as jktaylor911 and also as a Design Team Member on Kennedy Grace Creations blog (link on left side of this page).

Blessings to you,

Jill

Wednesday, November 15, 2017

Kennedy Grace Creations Grateful for Your Friendship (November Mood Board) card


Hello friends, I made this card for Kennedy Grace Creations using their November Mood Board  as inspiration.  This card is called, Grateful for our Friendship, because life is truly so much better with friends!  It showcases how you can stretch your stamp sets to be used for the holidays even though they are not holiday stamps.


 I primarily used the KGC stamp set You Inspire me to make this card.  I first prepped my card panel with Antique Linen Distress Oxide Ink (DOI) by dragging the pad down in vertical stripes to create what looks like a weathered wood panel door.  I then lightly traced a circle the size that I wanted my wreath to be and then used 3 of the small images from the stamp set (small leafy branch x 2, and the 3 dots) to make my wreath.  I used mostly Distress Oxide inks, inking each stamp one color and stamping it around the circle, then changing colors and again stamping around the circle, turning the leafy branches in different directions.  I tried to space out the colors in my stamping so as not to have one color be predominant in any location.  I did also use metallic gold pigment ink and metallic copper pigment ink to give the wreath a little shimmer here and there.  I stamped the dots (berries) on the wreath last using Fired Brick DOI and filling in any areas that needed it.  I stamped the sentiment from the same stamp set from KGCYou Inspire Me, in DOI using two of the colors from the wreath.  I stamped and die cut the bow from The Ton's Christmas Wreath Builder stamp set.  The tails ended up being a bit too long, so I trimmed them down to fit my card.  It is a layered ink stamp that I embellished with Copic markers for depth of color and a white gel pen for highlights.  I also stamped additional small branches around the "Grateful" sentiment and found some metallic gold card-stock and die cut some small poinsettias from a Spellbinders die set I had.  I placed rhinestones in the centers of each flower that I had colored with a Copic marker to match the deep red on the card.  I also found in my stash of adhesive stickers some small gold dots from Elizabeth Craft Designs.  I used three around my sentiment as well.

November Mood Board

To finish my card, I mounted a scalloped-stitched die cut frame from Avery Elle in a complementary color.  I them adhered it to a Confetti Cream side folding card base from Stampin' Up!

I hope you enjoyed my card and will feel inspired to stretch some of your non-holiday stamp sets this year. 

Gratefully yours,

Jill

Please be sure to follow the Kennedy Grace Creations blogfacebooktwitterinstagram and pinterest. Our Design Team has great projects to inspire you with our great stamp sets.  You Inspire me

**Kennedy Grace Creations products are linked to the store for your convenience!

Saturday, November 11, 2017

A Whimsy Stamp Christmas card (and a winner on 7 Kids Create! on FB)

Hello, my friends and fellow crafters.  It's November, so it's officially (I think) Christmas card season!  I'd like to share a Christmas card I made using a Whimsy Stamp, called Berry.  I decided for the first time to enter it in the 7 Kids Create! October challenge on Facebook.  Theme:  Anything Goes.  I posted it on the very last day of the challenge, and wouldn't you know (to my shock and awe) - I won!! 

So here's what I did to make this card.  I stamped little miss Berry on NSW 80# card-stock, then used Molotow Art Masking Liquid (2.0mm pump marker) to protect the image while I worked on the background.  I used two different winter snow trees because I didn't want them all to look the same.  I used a Penny Black Stamp Nature's Friends and Hero Arts stamp Color Layering Snowy Trees.  I used some WOW! Opaque White embossing powder on the trees.  I masked the foreground Penny Black trees with Post-it paper to then stamp and emboss the Hero Arts trees.  I used Distress Inks blended with Ranger Mini- ink Blending tools (Spun Sugar, Tumbled Glass and Broken China) for the sky.  I stamped the sentiment from The Ton Stamps Holiday Love Poinsettia in Versafine Black Onyx ink

Then the fun part - removing the masking fluid to Copic color this little cutie!!  I also used my Copics to color the snowy ground.  I like using a combo of cool greys (COO, C1, C3) and the very light BGs (BG000, BG00) for snow.  I also applied a bit of clear Wink of Stella to parts of the snow and on miss Berry. 

I cut down my card to 4.25" X 5.25" and adhered it to a red A2 side-folding cardbase that I had applied some Wink Of Stella to the bottom for some extra shimmer.

So that's it!!  I hope you like my card and you try out making some cards with some scenery in the background and masking.  It's so rewarding to make these little scenes that make your focal image come alive!!

Enjoy your Christmas and Holiday season, blessings to you -

Jill

**To see all of my card creations, look for me on IG as jktaylor911**

Wednesday, October 18, 2017

Sending Prayers

Welcome back to my Blog!  I've created an encouragement card for you using the Time to Blossom stamp set and new sequin mixes Cotton Candy and Chantilly Cream.  After all the recent tragedies, I felt the need to create this type of card.

Using Canson XL watercolor paper cut to ~3.5" square, I stamped the main floral image with Ranger Archival Jet Black ink.  I masked the image with some Molotow Art Masking Fluid, letting it dry.  I then water-colored the background stripes using Daniel Smith Mayan Blue Genuine watercolor in varying intensity.  When that was dry, I spattered flecks of about 4 different colors (I might have been a little heavy-handed here!).  Once dry, I removed the masking fluid and water-colored the floral image with several complementary Daniel Smith watercolors.  I also used a little clear Wink Of Stella on the light portions of the leaves and the tips of the flowers.  I then used a SSS Stitched Squares die on this panel.  Finally, I stamped the sentiment from the same stamp set in Versafine Onyx Black ink and glued on the sequins from the KGCs mixes, Cotton Candy and Chantilly Cream.  

I did struggle a bit with how I wanted to use this panel.  I finally decided I liked it positioned as a diamond, foam mounted to some black cardstock.  The black and white background paper is from MFTs.  I off-set the pink colored panel and hand drew the stitched lines.  I felt it needed some sparkle, so I found some adhesive backed silver glitter paper, cut a strip and placed it along the left edge of the pink panel.  All of this was adhered to a 5.5' square card-base.

Thank you for stopping by, I hope you enjoyed my card.  I've linked the Kennedy Grace Creations products to the store for your convenience.  This post will be included on the Kennedy Grace Creations Blog, as well as FB and IG.

Sending prayers to all of you affected by the recent tragedies.  My heart goes out to you.


               Jill

Wednesday, October 4, 2017

Kennedy Grace Creations Mood Board Shaker Card

Hello, this is Jill making a card for Kennedy Grace Creations!!  I created this card for October with their Mood Board as inspiration.  I used a stamp set originally tailored for Moms/Mother's Day, etc. as I loved the flower image and always thought it would make a great shaker type card.  It's called Loving Mom.  I only used the largest flower image on this card and took my cues on coloring it from the mood board.

First I die cut a circle into an A2 sized 80# NSW card stock using a MFTs Die- Circle Shaker Window and Frame set.  I knew I'd be using a MFTs Circle Shaker Pouch, so the sizing of the circle die was perfect for the pouch.  I then stamped the 4 flower images around the die cut window and placed masks over each one, as I was going to color the background with some Distress Oxide inks.  As I sometimes like to do, I had already practiced the background on another piece of lesser quality card stock since I wasn't exactly sure how it would look.  I used first Twisted Citron Distress Oxide ink in various spots on the paper.  Then I used Black Soot to fill-in, blend, and cover-up some of the Twisted Citron.  The only change I made was adding the Encore! Silver pigment ink.  It bridged the two colors nicely and added a little sheen as well.  I removed the masks and immediately liked the bold whiteness of the flowers against the background.  So I decided that I would bring in the orange color to the inside of the window, the window frame and the stamens on the flowers.

I'd been wanting to use this Silver Gem Nuvo Glimmer Paste that I'd had for a couple months, so I used the inside circle of the window I had die cut, placed a Penny Black Hypnotic stencil over it and carefully spread out the paste onto the circle.  Once dry (which it does rather quickly, so clean your stencil and spatula immediately, or you'll regret it!) I air-brushed the circle with my R12 Copic marker so that the card stock and the glitter was the same color.  I then went about coloring my flowers.  I used C1 and C3 Copic markers on the petals, and E93 and R14  on the stamen.  I also added some clear Wink of Stella to the stamen as well.

I chose a sentiment from another KGC stamp set called Time to Blossom.  I heat embossed the sentiment with WOW! Opaque White embossing powder.  I chose multiple color sequins from a variety of KGC sequin mixes.  I regrettably didn't have any orange sequins (that I will have to fix!).  I mounted my trimmed panel onto 110# NSW card base that I had used some 1/2" adhesive backed foil in burnished silver from The Ton along each side. The frame was difficult to decide what color/finish it should have.  I finally decided on orange foil (I used a Peel and Stick Toner Sheet and Foil from Deco Foil).  I layered it on top of other rejected frames to give it some dimension and sturdiness.  Finally, not quite satisfied, I found the silver metal "together" piece that I'd had for years in my stash.  I do not know who made it, possibly Making Memories, as I used to buy a lot of their nick-knacks way back when.

So that is it!!  My October Shaker Mood Board card, and another lengthy dissertation from me.  I'll forego a products list since I include it in my write-up.  KGC products are linked.  Please, if I was not clear on a product that I used or a technique, use the comment section and I'll be sure to answer any questions you may have.

Thank you for stopping by, I hope you enjoyed my card.  Join in the fun of creating cards with the October Mood Board and post it on the Kennedy Grace Creations Fan Page on Facebook!  If you prefer to share elsewhere, remember to tag it #kennedygracecreations so we can admire your work. 


Have a blessed day!

Jill ðŸ’Œ


Friday, September 29, 2017

Kennedy Grace Creations Blog Hop - New Release - Friendship Blessings Acetate Panel Card

Good Morning Crafty Friends and Welcome to 
Kennedy Grace Creations September Blog Hop!
We are so happy you have stopped by and joined us for this very special event!


Our newest release of Stamp and Sequins is now live and available for purchase in the store!
  
I'm Jill, here is what I have created for you on the Blog Hop for the Fall 2017 New Release.

I have used one of the new stamps, Friendship Blessings as the focal floral image in my card and embellished the card with a new sequin mix called Beach Side Bliss.


To make this card, I started with a standard A2 side folding card base of 110# NSW card stock.  I measured my stamped image for the inside panel, then cut away the excess from the top panel, reserving a narrow side strip (it will create the sandwich for the acetate and cover-up the tape on the back side of the top colored panel).  I then cut a piece of clear acetate a bit larger than the stamped image and wide enough to line up with the outside edge of the card. Next I went about creating my top panel.  On NSW cardstock, I blended 4 colors of Distress Oxide Inks (see colors below).  I then created some shimmer mist with water and Perfect Pearls.  I misted a Penny Black background stamp (Blips) fairly generously with the shimmer mist then lay the colored panel onto the stamp and pressed firmly down.  I maintained pressure longer than usual to make sure the water was getting absorbed. The more water you use, the more vibrant the reaction (up to a point of course).  The water in the mist reacts with the Distress Oxide Inks to give you the lighter color that you see stamped on the panel.  It shimmers beautifully, which regrettably I was unable to capture for you, but it is quite lovely.  I dried the panel with my heat tool to minimize warping.  I put a heavy block onto it to ensure it stayed flat.  I next used my MISTI stamping tool and stamped both floral images with Hero Arts Intense Black Ink (Copic friendly). Then on to the fun part, the coloring!! I actually colored a practice image first because I wasn't sure what color flowers I wanted, blue or yellow, or one of each! I placed the colored images next to my colored panel to see what I liked.  Though I love yellow flowers, I thought the blue looked best.  I then colored the stems a similar hue of green that is on the top panel (see Copic list below).  Once the Copic coloring was done, I felt it needed more detail, so I got my colored pencils out and worked on the veining and dark dots on the flowers.  Lastly I used my white gel pen for additional white dots on both the petals and the stems (hard to see).  Now I was ready to assemble the card.  I cut my colored panel to the exact same size as the card base and strip.  I stamped a sentiment from Simon Says Stamp Uplifting Thoughts stamp and the small heart from a Kennedy Grace Creations stamp You Inspire Me in Versafine Onyx Black pigment ink (the best for deep, crisp impressions I think).  I first lined up the clear acetate with the card base edges, then adhered it to that card base using some high tack double sided adhesive tape (Crafty Power Tape) from Scrapbook Adhesives.  Then using the same tape, I adhered the colored panels to the card base and the acetate.  I adhered the retained card base strip to the back side of the narrow colored panel on the outside edge of the card.  Lastly, I used 3 sequins from the Kennedy Grace Creations new sequin mix Beach Side Bliss (I chose a blue, a green and a silver sequin) to coordinate with the colors of the colored panel.  I used Ranger Multi Medium Matte to adhere the sequins securely.  I considered die cutting a butterfly and adhering it where the colored panel and acetate meet, but felt in the end that it made the card too busy.  Another option with this type of card is stamping and/or embossing on the acetate panel, since I used a heat resistant/emboss-able acetate. Another time, another card!
That completes my card, I hope you enjoyed a somewhat non-traditional card style and some additional ideas when using acetate.

Card with Beach Side Bliss Sequin Mix
Have a lovely and blessed day my friends,

Jill                        


Supply List:

Stamps:  Kennedy Grace Creations Friendship Blessings and
You Inspire Me,
Penny Black background stamp Blips, Simon Says Stamp sentiment stamp Uplifting Thoughts
Cardstock:  Neenah Solar White 110#
Hot Off The Press Heat Resistant Acetate
Ranger Distress Oxide Ink (Salty Ocean, Peacock Feathers, Cracked Pistachio and Twisted Citron)
Copic Sketch Markers (B21, B24, B28, YG41, YG45, Y13)
Kennedy Grace Creations Sequin Mix Beach Side Bliss
Caran D'ache Pablo colour pencils (12 ct.)
Sakura Gelly Roll (white gel pen)
Ranger Multi Medium Matte adhesive
Hero Arts Intense Black Ink
Tsukineko Versafine Onyx Black pigment ink
DIY shimmer mist made with Ranger Perfect Pearls
Scrapbook Adhesives Crafty Power Tape


We will be giving away a prize package to one lucky winner.


All you have to do is join us for hop and leave a comment on each project. The more you comment the more chances you have to win!! Winner will be announced on Monday.

We hope you have enjoyed this release and will hop along to see what our talented designers have made using the Stamps and Sequins from our September release.

Your next stop is the lovely and talented:  Donna
https://donnaisplayingpaper.wordpress.com/2017/09/29/spring-crocuses/

But just in case you miss someone along the way, I have included the entire hop for you!

                     Jill --you are here
Donna

Thank you for stopping by today! 

Thursday, September 28, 2017

Kennedy Grace Creations Fall 2017 Release Sneak Peek #2

Hello again friends and crafters, I'm Jill and I'll be sharing another Sneak Peek card for you for Kennedy Grace Creations Fall release.  This card has some similarities with my other card, however I felt it was different enough and I used some different products as well, that I wanted to share.  As my first card was bright and vibrant with Fall colors, this one is softer and more subdued.

I started this card by white heat-embossing the floral image from the lovely new stamp set Friendship Blessings by Kennedy Grace Creations onto some Arches hot-pressed watercolor paper, then white heat-embossing the 3 white dots stamp from KGC's stamp You Inspire Me around the floral image.  I then water-colored the image with Sakura Koi watercolors.  It was my first time using those watercolors, and I must say I was impressed.  While that panel dried, I die cut some frames from Reverse Confetti's All Framed Up die in some white and Silver Starlight cardstock.  I then found some Stampin' Up! Baja Breeze cardstock for a background layer that I die cut with a larger stitched rectangle die.  As I was assembling my card, I felt that the blue cardstock needed some stamping.  So I went back to the You Inspire Me stamp set and used the same 3 dot stamp as well as 2 small leafy branch stamps.  I heat-embossed the dots white to repeat an element from inside the frames, and just used clear embossing with the leaf images.  Once my layers were adhered to the blue cardstock I decided to use a Stampin' Up! product that I'd not used for quite some time (collecting dust as you might say).  I'm talking about the metal frame around the Friendship Blessings sentiment.  It was from an embellishment kit called Hodgepodge Hardware.  It had 5 different frames to choose from and several brads to secure it to your project.  I however chose different Stampin' Up! brads, these were small silver metal with clear rhinestones in the center.  I wanted a little Bling!  I had no punch or die to match the shape of the frame, so I traced it then fussy cut it out.  I then stamped the sentiment with Lawn Fawn's Hippo dye ink, as I felt black ink would be too stark compared to the soft color palette I had used.  I carefully glued the frame and cardstock with Ranger Multi Medium Matte.  When it was secure, I positioned the frame where I wanted it, marked the holes, then used a pokey tool to create 2 small openings for the brads.  I put tape runner adhesive on the back side of the sentiment cardstock and secured the frame in place with the brads.  I then adhered the finished panels onto a standard A2 top-folding card base of NSW 110# cardstock.

With my project complete, it reminded me to look around my craft room more for those rarely used items that sometimes are just perfect for what I am working on.  So I encourage you too, to explore the dusty recesses of your craft room for those hidden jewels you've forgotten about (we all have them!).

Thank you for stopping by, I hope you enjoyed my card.


Wishing you friendly blessings and warm hugs,

Jill

Tuesday, September 26, 2017

Kennedy Grace Creations Fall 2017 Sneak Peek Card

Hello friends and followers, Jill here for Kennedy Grace Creations for a little "Sneak Peek" at some of the new Fall
products being released.                           
I have a card featuring the Friendship Blessings Stamp and the Chantilly Cream Sequin Mix.

For this card, I initially created a card background from Arches hot-pressed watercolor paper and clear embossed some solid leaf images from Altenew's Floral Shadows. I then used some Brusho watercolor powders in Lime Green to create a background that was deeper green in the middle where the flower image would go. While that dried, I heat embossed the flower image with Rose Gold Embossing Powder from The Ton, then water-colored the image using Daniel Smith Watercolors.  I then fussy cut out the image. I used 3 frames from Reverse Confetti's All Framed Up die in 3 colors- Gold, Silver Starlight, and Calypso Coral, and placed some 30# Vellum behind the flower and inside the gold frame so I could stamp my sentiment.  I finished off the card with some lovely Chantilly Cream sequins from Kennedy Grace Creations that are really nice because they are a cream color, but have a rainbow-like finish that displays multiple subtle colors that doesn't overwhelm your project.  I think I found a new favorite sequin!!  Hope you enjoyed my card.  Thank you for visiting!

Don't forget to stop by the Kennedy Grace Creations Blog to see other "Sneak Peeks" this week, then the Blog Hop on Friday the 29th!

Hugs,

Jill

Tuesday, September 19, 2017

Just a (yellow) Rose card for Kennedy Grace Creations

Jill here, back again to share a card I made using Kennedy Grace Creation's stamp, Just a Rose.

Before I go into the how-to's of this card, I want to tell you about an up-coming Blog Hop with the Kennedy Grace Creations design team, that I'm a part of.  Watch for posts on Instagram and Facebook for the date (it's coming up soon!)  It will feature cards primarily using New Release products.

Jill  Designer

My idea was to create an elegant card with bold accenting.  
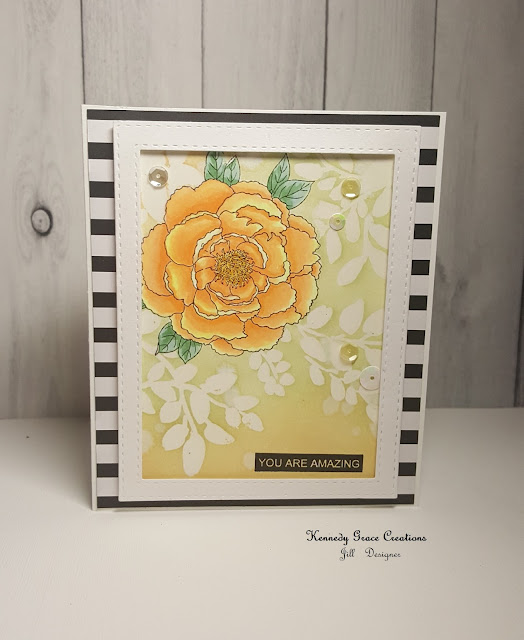
I chose to use Stampin' Up!'s black and white striped DS paper as my backdrop for the card's main design layer.  I first stamped the rose image on NSW 80# cardstock, then carefully masked over it so that I could white heat emboss the leaf  images from Altenew's Floral Shadow stamp.  I then blended some Antique Linen and Old Paper Distress Inks onto the cardstock to bring out those leafy images. I then unmasked my rose and proceeded to color it in Copic markers, light yellows and oranges (my favorite color rose). I used a slightly darker/browner orange for the stamens, then swiped some Wink of Stella across them for a little shimmer. I colored the leaves then decided I wanted to frame the flower panel, so I die cut a frame using 2 Stitched Rectangles from Simon Says Stamp from some NSW 110# cardstock.  I foam mounted the frame onto the flower panel for some dimension.  I then stamped the sentiment from the same KGC stamp set in Versafine Onyx Black pigment ink (the best for really black, detailed images I think).  After adhering all the layers together onto #110 NSW card base, I gathered several sequins from KGC's Honey Bee mix and 1 silvery sequin from the Tropical Treasure Mix and randomly placed them into a visually appealing pattern (Hmm, a "random pattern" sounds a bit contradictory, but I think you know what I mean!).  **Of note, because I needed a certain amount of the black striping to show, my card dimension is not standard.  It ended up being 4.5" x 5.5".  Thank you for stopping by and seeing my creation.  I hope it gives you some interesting ideas to try out.

Happy crafting!!

Jill

Supplies List:

NSW 80# and 110# cardstock
Stampin Up!  Designer Series Paper Stack, Stacked With Love
Kennedy Grace Creations stamp, Just a Rose
Altenew stamp, Floral Shadows
WOW!  Ultrafine White Embossing Powder
Versamark Ink
Versafine Onyx Black Pigment Ink
Hero Arts Intense Black Ink (Copic friendly)
Copic Sketch Markers (list provided upon request)
Distress Ink in Antique Linen and Old Paper
Wink of Stella Clear
Simon Says Stamp Stitched Rectangle dies (x2)
Kennedy Grace Creations Sequin Mixes, Honey Bee and Tropical Treasure
Ranger Multi Medium Matte
3M foam adhesive
Scotch ATG Adhesive Transfer Tape

Wednesday, August 23, 2017

Kennedy Grace Creations- Beautiful Blooms- Sweet Rose

Welcome to my Blog-

Here's my first card using stamps from Kennedy Grace Creations.  I wanted to create a window card with the sentiment on the inside panel. For the window, I used a MFTs die (I die cut it at the end of  making the card).  First off, I stamped and masked the rose images (three in all), then used an Altenew stencil with their shimmer ink spray for the background.  It is very shimmery, which you can't really see here. Once dry, I removed the masks and began my Copic coloring.  I wanted the yellow roses to be very light, so I left some white edges along some of the petals. However, they didn't end up as light as I had wished.  The pink is a nice dusty rose color which I think complements the yellow quite well.  Once the leaves were done, I went to work on the window portion of the card.  I die cut the window, then mounted the panel onto some fun foam for dimension. I then mounted that onto a NSW #110 card base that I had die cut out the window in the same location as the stamped panel.  I then stamped and embossed the birthday sentiment inside the window.  I added some sequins from Kennedy Grace Creations as well.  It was a complimentary pack, so I don't know the name.  I also decided to cut down the size of the card so that the stamped panel was only 4" in height. That allowed me to color the bottom edge of the card with the Gold Wink of Stella, which I also added to the middle of the flowers.  I was very happy with how this card came out, using products that I had never used before.

I hope you enjoyed this, happy stamping!

Jill


Supplies:

Kennedy Grace Creations (KGC) Stamp- Beautiful Blooms- Sweet Rose
Altenew Metallic Shimmer Ink Spray- Sea Glass
Altenew Stencil- Watercolor Lines
MFTs Stitched Sentiment Window
Fun Foam
Copic Markers
Wink of Stella (clear and gold)
KGC sequins
Versafine Onyx Ink
Clear Embossing Powder
Ranger Multi-medium Matte

Most Recent Post

LOA From TRS