Jill Taylor

Jill Taylor
Jill Taylor

Friday, September 29, 2017

Kennedy Grace Creations Blog Hop - New Release - Friendship Blessings Acetate Panel Card

Good Morning Crafty Friends and Welcome to 
Kennedy Grace Creations September Blog Hop!
We are so happy you have stopped by and joined us for this very special event!


Our newest release of Stamp and Sequins is now live and available for purchase in the store!
  
I'm Jill, here is what I have created for you on the Blog Hop for the Fall 2017 New Release.

I have used one of the new stamps, Friendship Blessings as the focal floral image in my card and embellished the card with a new sequin mix called Beach Side Bliss.


To make this card, I started with a standard A2 side folding card base of 110# NSW card stock.  I measured my stamped image for the inside panel, then cut away the excess from the top panel, reserving a narrow side strip (it will create the sandwich for the acetate and cover-up the tape on the back side of the top colored panel).  I then cut a piece of clear acetate a bit larger than the stamped image and wide enough to line up with the outside edge of the card. Next I went about creating my top panel.  On NSW cardstock, I blended 4 colors of Distress Oxide Inks (see colors below).  I then created some shimmer mist with water and Perfect Pearls.  I misted a Penny Black background stamp (Blips) fairly generously with the shimmer mist then lay the colored panel onto the stamp and pressed firmly down.  I maintained pressure longer than usual to make sure the water was getting absorbed. The more water you use, the more vibrant the reaction (up to a point of course).  The water in the mist reacts with the Distress Oxide Inks to give you the lighter color that you see stamped on the panel.  It shimmers beautifully, which regrettably I was unable to capture for you, but it is quite lovely.  I dried the panel with my heat tool to minimize warping.  I put a heavy block onto it to ensure it stayed flat.  I next used my MISTI stamping tool and stamped both floral images with Hero Arts Intense Black Ink (Copic friendly). Then on to the fun part, the coloring!! I actually colored a practice image first because I wasn't sure what color flowers I wanted, blue or yellow, or one of each! I placed the colored images next to my colored panel to see what I liked.  Though I love yellow flowers, I thought the blue looked best.  I then colored the stems a similar hue of green that is on the top panel (see Copic list below).  Once the Copic coloring was done, I felt it needed more detail, so I got my colored pencils out and worked on the veining and dark dots on the flowers.  Lastly I used my white gel pen for additional white dots on both the petals and the stems (hard to see).  Now I was ready to assemble the card.  I cut my colored panel to the exact same size as the card base and strip.  I stamped a sentiment from Simon Says Stamp Uplifting Thoughts stamp and the small heart from a Kennedy Grace Creations stamp You Inspire Me in Versafine Onyx Black pigment ink (the best for deep, crisp impressions I think).  I first lined up the clear acetate with the card base edges, then adhered it to that card base using some high tack double sided adhesive tape (Crafty Power Tape) from Scrapbook Adhesives.  Then using the same tape, I adhered the colored panels to the card base and the acetate.  I adhered the retained card base strip to the back side of the narrow colored panel on the outside edge of the card.  Lastly, I used 3 sequins from the Kennedy Grace Creations new sequin mix Beach Side Bliss (I chose a blue, a green and a silver sequin) to coordinate with the colors of the colored panel.  I used Ranger Multi Medium Matte to adhere the sequins securely.  I considered die cutting a butterfly and adhering it where the colored panel and acetate meet, but felt in the end that it made the card too busy.  Another option with this type of card is stamping and/or embossing on the acetate panel, since I used a heat resistant/emboss-able acetate. Another time, another card!
That completes my card, I hope you enjoyed a somewhat non-traditional card style and some additional ideas when using acetate.

Card with Beach Side Bliss Sequin Mix
Have a lovely and blessed day my friends,

Jill                        


Supply List:

Stamps:  Kennedy Grace Creations Friendship Blessings and
You Inspire Me,
Penny Black background stamp Blips, Simon Says Stamp sentiment stamp Uplifting Thoughts
Cardstock:  Neenah Solar White 110#
Hot Off The Press Heat Resistant Acetate
Ranger Distress Oxide Ink (Salty Ocean, Peacock Feathers, Cracked Pistachio and Twisted Citron)
Copic Sketch Markers (B21, B24, B28, YG41, YG45, Y13)
Kennedy Grace Creations Sequin Mix Beach Side Bliss
Caran D'ache Pablo colour pencils (12 ct.)
Sakura Gelly Roll (white gel pen)
Ranger Multi Medium Matte adhesive
Hero Arts Intense Black Ink
Tsukineko Versafine Onyx Black pigment ink
DIY shimmer mist made with Ranger Perfect Pearls
Scrapbook Adhesives Crafty Power Tape


We will be giving away a prize package to one lucky winner.


All you have to do is join us for hop and leave a comment on each project. The more you comment the more chances you have to win!! Winner will be announced on Monday.

We hope you have enjoyed this release and will hop along to see what our talented designers have made using the Stamps and Sequins from our September release.

Your next stop is the lovely and talented:  Donna
https://donnaisplayingpaper.wordpress.com/2017/09/29/spring-crocuses/

But just in case you miss someone along the way, I have included the entire hop for you!

                     Jill --you are here
Donna

Thank you for stopping by today! 

Thursday, September 28, 2017

Kennedy Grace Creations Fall 2017 Release Sneak Peek #2

Hello again friends and crafters, I'm Jill and I'll be sharing another Sneak Peek card for you for Kennedy Grace Creations Fall release.  This card has some similarities with my other card, however I felt it was different enough and I used some different products as well, that I wanted to share.  As my first card was bright and vibrant with Fall colors, this one is softer and more subdued.

I started this card by white heat-embossing the floral image from the lovely new stamp set Friendship Blessings by Kennedy Grace Creations onto some Arches hot-pressed watercolor paper, then white heat-embossing the 3 white dots stamp from KGC's stamp You Inspire Me around the floral image.  I then water-colored the image with Sakura Koi watercolors.  It was my first time using those watercolors, and I must say I was impressed.  While that panel dried, I die cut some frames from Reverse Confetti's All Framed Up die in some white and Silver Starlight cardstock.  I then found some Stampin' Up! Baja Breeze cardstock for a background layer that I die cut with a larger stitched rectangle die.  As I was assembling my card, I felt that the blue cardstock needed some stamping.  So I went back to the You Inspire Me stamp set and used the same 3 dot stamp as well as 2 small leafy branch stamps.  I heat-embossed the dots white to repeat an element from inside the frames, and just used clear embossing with the leaf images.  Once my layers were adhered to the blue cardstock I decided to use a Stampin' Up! product that I'd not used for quite some time (collecting dust as you might say).  I'm talking about the metal frame around the Friendship Blessings sentiment.  It was from an embellishment kit called Hodgepodge Hardware.  It had 5 different frames to choose from and several brads to secure it to your project.  I however chose different Stampin' Up! brads, these were small silver metal with clear rhinestones in the center.  I wanted a little Bling!  I had no punch or die to match the shape of the frame, so I traced it then fussy cut it out.  I then stamped the sentiment with Lawn Fawn's Hippo dye ink, as I felt black ink would be too stark compared to the soft color palette I had used.  I carefully glued the frame and cardstock with Ranger Multi Medium Matte.  When it was secure, I positioned the frame where I wanted it, marked the holes, then used a pokey tool to create 2 small openings for the brads.  I put tape runner adhesive on the back side of the sentiment cardstock and secured the frame in place with the brads.  I then adhered the finished panels onto a standard A2 top-folding card base of NSW 110# cardstock.

With my project complete, it reminded me to look around my craft room more for those rarely used items that sometimes are just perfect for what I am working on.  So I encourage you too, to explore the dusty recesses of your craft room for those hidden jewels you've forgotten about (we all have them!).

Thank you for stopping by, I hope you enjoyed my card.


Wishing you friendly blessings and warm hugs,

Jill

Tuesday, September 26, 2017

Kennedy Grace Creations Fall 2017 Sneak Peek Card

Hello friends and followers, Jill here for Kennedy Grace Creations for a little "Sneak Peek" at some of the new Fall
products being released.                           
I have a card featuring the Friendship Blessings Stamp and the Chantilly Cream Sequin Mix.

For this card, I initially created a card background from Arches hot-pressed watercolor paper and clear embossed some solid leaf images from Altenew's Floral Shadows. I then used some Brusho watercolor powders in Lime Green to create a background that was deeper green in the middle where the flower image would go. While that dried, I heat embossed the flower image with Rose Gold Embossing Powder from The Ton, then water-colored the image using Daniel Smith Watercolors.  I then fussy cut out the image. I used 3 frames from Reverse Confetti's All Framed Up die in 3 colors- Gold, Silver Starlight, and Calypso Coral, and placed some 30# Vellum behind the flower and inside the gold frame so I could stamp my sentiment.  I finished off the card with some lovely Chantilly Cream sequins from Kennedy Grace Creations that are really nice because they are a cream color, but have a rainbow-like finish that displays multiple subtle colors that doesn't overwhelm your project.  I think I found a new favorite sequin!!  Hope you enjoyed my card.  Thank you for visiting!

Don't forget to stop by the Kennedy Grace Creations Blog to see other "Sneak Peeks" this week, then the Blog Hop on Friday the 29th!

Hugs,

Jill

Tuesday, September 19, 2017

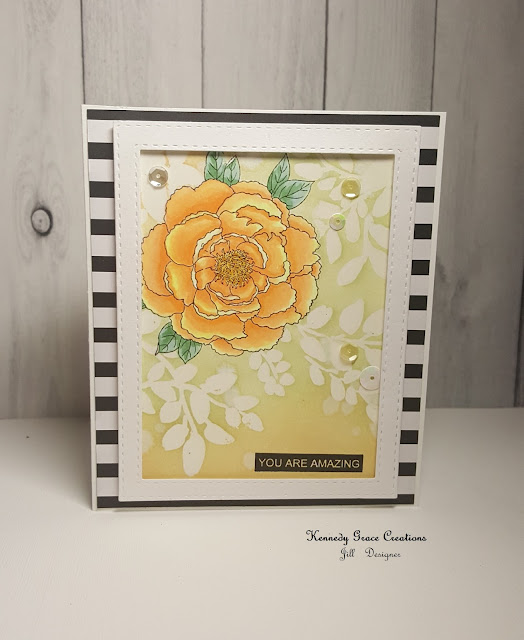
Just a (yellow) Rose card for Kennedy Grace Creations

Jill here, back again to share a card I made using Kennedy Grace Creation's stamp, Just a Rose.

Before I go into the how-to's of this card, I want to tell you about an up-coming Blog Hop with the Kennedy Grace Creations design team, that I'm a part of.  Watch for posts on Instagram and Facebook for the date (it's coming up soon!)  It will feature cards primarily using New Release products.

Jill  Designer

My idea was to create an elegant card with bold accenting.  
I chose to use Stampin' Up!'s black and white striped DS paper as my backdrop for the card's main design layer.  I first stamped the rose image on NSW 80# cardstock, then carefully masked over it so that I could white heat emboss the leaf  images from Altenew's Floral Shadow stamp.  I then blended some Antique Linen and Old Paper Distress Inks onto the cardstock to bring out those leafy images. I then unmasked my rose and proceeded to color it in Copic markers, light yellows and oranges (my favorite color rose). I used a slightly darker/browner orange for the stamens, then swiped some Wink of Stella across them for a little shimmer. I colored the leaves then decided I wanted to frame the flower panel, so I die cut a frame using 2 Stitched Rectangles from Simon Says Stamp from some NSW 110# cardstock.  I foam mounted the frame onto the flower panel for some dimension.  I then stamped the sentiment from the same KGC stamp set in Versafine Onyx Black pigment ink (the best for really black, detailed images I think).  After adhering all the layers together onto #110 NSW card base, I gathered several sequins from KGC's Honey Bee mix and 1 silvery sequin from the Tropical Treasure Mix and randomly placed them into a visually appealing pattern (Hmm, a "random pattern" sounds a bit contradictory, but I think you know what I mean!).  **Of note, because I needed a certain amount of the black striping to show, my card dimension is not standard.  It ended up being 4.5" x 5.5".  Thank you for stopping by and seeing my creation.  I hope it gives you some interesting ideas to try out.

Happy crafting!!

Jill

Supplies List:

NSW 80# and 110# cardstock
Stampin Up!  Designer Series Paper Stack, Stacked With Love
Kennedy Grace Creations stamp, Just a Rose
Altenew stamp, Floral Shadows
WOW!  Ultrafine White Embossing Powder
Versamark Ink
Versafine Onyx Black Pigment Ink
Hero Arts Intense Black Ink (Copic friendly)
Copic Sketch Markers (list provided upon request)
Distress Ink in Antique Linen and Old Paper
Wink of Stella Clear
Simon Says Stamp Stitched Rectangle dies (x2)
Kennedy Grace Creations Sequin Mixes, Honey Bee and Tropical Treasure
Ranger Multi Medium Matte
3M foam adhesive
Scotch ATG Adhesive Transfer Tape

Most Recent Post

LOA From TRS